Sunday, October 31, 2010

Front Porch for Fall (Part 2)

In addition to our chair cover makeover, we wanted to add some fall foliage to our front porch.  We came across beautiful and pretty inexpensive plants at Home Depot about a month ago.  We normally shop at Lowe's, but were disappointed in their plant selection, (it was still pretty early in the season) so we went next door to Home Depot.  We picked up two large and two small terra cotta pots along with some white spray paint and potting soil.  


Here is what our potted plants looked like when we first planted them.


And, now, about a month later....


In the small pots is October Daphne.  It very much looks like a succulent (which is what drew me to it at the store). 


In the large pots is varying colors of Coleus.  These were only $1 each, so we chose about six different plants for each pot.  The colors are so bright and beautiful (and have changed slightly since we first planted them).  They simply scream fall and are only getting more beautiful as the season unveils.
The pots only took two coats of spray paint and the white really looks crisp and fresh against the beautiful plants.  

This is just one of the many reasons fall is my favorite season.  Such beautiful things grow and flourish in the cooler air of autumn.

Saturday, October 30, 2010

Keepin' It Simple

Sometimes, it's really nice to just keep things simple.  There's nothing easier than the quick autumn table I whipped up in about two minutes, well, really it was less than a minute.  Sure, there's not much to it, but I think it's simplicity is refreshing.   


I found these pumpkins last year on sale at Hobby Lobby for a couple bucks each. My favorite is the little one made of leaves.  Sure, they are fake, but you can't beat all of the autumn colors, and I can use them for many years to come.


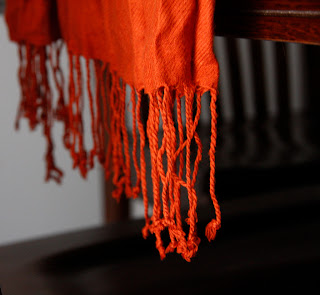
The table runner is a pashmina I pulled from my closet, and the length is simply perfect for our table.  
 

I love adding texture anywhere I can, and these pumpkins have some great texture! 


Happy Autumn!

Friday, October 29, 2010

Candy Corn Crafts

With Halloween around the corner, I wanted to share with you how we have made our home a little more festive for the holiday.  


I came across this Woman's Day magazine and it instantly caught my eye. Along with the wreath, there are some great projects featured within.  


I had grand plans to make a couple of the projects, however, after being sick for longer than I ever expected, I only got around to making one of them, the candy corn garland.
It turned out great and since it was so easy, anyone can create it at home.

All you need is a bag of candy corn, a needle, and fishing line.  Since I had fishing line and a needle on hand, we only had to buy a $2 bag of candy corn.  


Simply string your fishing line with candy corn, but be careful not to string the candies directly on the lines where the colors change, as the candy corns tend to break easier as those points.  Alan zapped our candy corn for 15-25 seconds in the microwave to make stringing a bit easier and it helped move the project along much quicker.  

Don't worry if some of your candies break. You can't win 'em all.  We just saved the broken ones and ate them when we needed a little something sweet.  
Once our entire bag was strung, we simply tied off the ends and hung it up!

Unfortunately, as the candies have slowly started to dry out, they have been breaking more and more easily.  I am planning to spray it with a clear coat of spray paint to see if that will help preserve the garland for use next year.  The garland strand is pretty heavy as well, so hanging it got to be quite a challenge, but we finally found a good spot for it on our chalkboard!

Monday, October 25, 2010

Front Porch for Fall

Since the weather has begun to get a bit colder (just a bit) here in Georgia, we have been feeling the need to spruce up our front porch accordingly for the coming season.  Something felt a little off about the table and chair set we currently have on the porch.  


Perhaps it was the vibrant summer hued stripes!


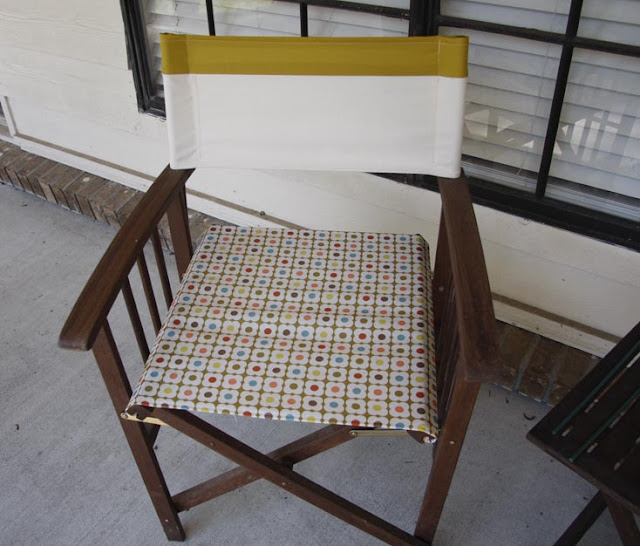
Well, after finding some cream colored seat covers at Lowe's for only $2.50 a piece, we knew it would be the perfect answer to neutralizing our chairs and making it feel a little less like summer on our porch.


The only problem:  The seat cover wasn't wide enough, and the top needed to be just a tad bigger in order to cover up the top of the chair.


Before returning the covers to the store, I shopped around the house to see if I had any fabric that might work to help fix the problem.  What I found was the laundry bag I used when I was living in the dorms to lug my dirty clothes down to the laundry room.  It had been hanging up in the laundry room, unused since we moved in. 


It was the perfect waterproof material to use on the porch chairs that would be exposed to the elements.  The bag was large, and gave me plenty of material to use for the chair seats.  With a little cutting and a few minutes at the sewing machine I was able to simply use the existing (summer striped) covers as a pattern for new covers.  


The colors in the fabric were perfect to help us add some autumn shades to our porch. 

For only about $5 and a little time, we have a completely new set of covers for our porch chairs.  


Next up, I'll share some other things we've done with the porch since we moved in, along with some more recent additions for the fall.

Thursday, October 21, 2010

Subfloor No More

Oh yea...and new paint on the walls!


With the sheetrock, icing, wait, I mean mudding, sanding, mudding, and more sanding done, we were finally ready to install the new floors and add some new color to the walls.


After living with sock snagging subfloor for long enough, we were really excited to finally get the new floors put down.  We chose to go with Pergo laminate flooring in Thoroughbred Oak that we found at our local Lowe's.  


For us, this was the most cost effective option and we knew that it would be durable enough to last.  Unlike real hardwoods, which can be much more expensive, Pergo doesn't scratch and is pretty simple to install.  


We really liked the idea of dark floors, and this was the darkest we found.  After ordering the amount of square footage we needed, we simply waited for our pallet of flooring to arrive and then got busy installing it.


Along with our new, darker floors, we knew we wanted to change our every-wall-is-beige that the previous owners painted before selling.  Let's just say, it wasn't just that they painted every wall the same exact beige, even things that shouldn't be painted were painted.  Doorknobs were beige, hinges were beige, even the baseboards, window trim, and doors were beige.  We chose to go a different route and painted our new living area gray.  Here, you can see, the baseboards were also getting a fresh coat of white.  


New floors, new wall color, and crisp trim paint really helped to freshen the space up.  It is finally starting to feel a little more like us.  Whatever "us" is.  I don't know that even we have that figured out yet, but that's what this journey is all about.

Wednesday, October 20, 2010

We've Got Some Catching Up To Do

Well, it seems as though being sick with mono is the best way to keep me from living any semblance of a normal life.  Yep, I have been sick for quite some time now it seems and it has kept me out of work and from doing much of anything around the house, except of course, holding the couch down. 

I am finally beginning to feel a little more like myself, and can now continue to share with you the journey of our little nest.  


Where did we leave off?   


Oh, right, sheetrock.


Yea, that's thrilling right? 


Well, not really.


Here's what our house looked like during that process.  It was pretty much a mess.  We had to sheetrock the wall behind the television. Remember, that was our old wood paneled den wall? Then, the column and the beams also needed a good dose of some sheetrock.  


Once we finished up sheet rocking everything, it was time for my favorite part!  Icing our house!


Yes, I know it sounds weird, but there is something that I just loved about mudding our newly sheet rocked walls. I don't know if it's the wannabe Food Network chef/baker that makes me love it so, but I do, I just love it.  


With mud and trowel in hand I was happy to spend all day icing our house. 


Don't be confused by my serious face. I really was enjoying myself. But, I was intensely working on getting that column perfect.  And, let me tell you it wasn't easy, and well, still probably isn't perfect.


[On a side note, check out that awesome couch behind me. That couch belonged to Alan's parents when they were first married and then Alan took it to college with him and then, it came with him to our house. Let's just say, that is THE most comfortable couch you will ever sit on, well, actually it sleeps much better than it sits.  Many a naps have been taken on that bad boy.  As long as Alan has had the couch it has sported a neutral slipcover, so the original upholstery rarely gets to shine in all it's glory.  We have considered getting it reupholstered because you just can't find comfort like that in a new couch these days, and well, that's where Alan proposed to me.  Yep, right there, on the very couch we shared our first kiss.  A lot of really great memories are wrapped up in that ol' thing.  Many Braves games and really great movies were watched from that couch, along with really great times with friends doing whatever we did in college...right.  having fun.  Well, now that we've gone down memory lane.  There are many more memories associated with that couch than I realized before I started on that tangent.  Now back to the regularly scheduled program.]


Well, after mudding comes sanding, and if you thought the house looked bad during the sheetrock process. Just wait for the sanding process. There was a lot of mudding, letting the mud dry, and sanding, again and again, until it was perfect.
This is what it looked like after Alan sanded. Dust. Literally. Everywhere. 


And, there's me, still working on that column.  I was determined. 


After most all of the sheetrock, mudding, sanding, mudding, and more sanding was done, the space is starting to come together quite nicely. 


Next up, new flooring goes down, and maybe I will share some other fun fall projects I am currently working on! 

Thursday, October 7, 2010

Walls are Comin' Down

After returning from our wedding trip to New York City last Christmas, we got busy tearing down a couple of walls to really open up our living area and kitchen.  You can get caught up on the before pictures in this post.

With the help of Alan's Dad, we got busy transforming our house 


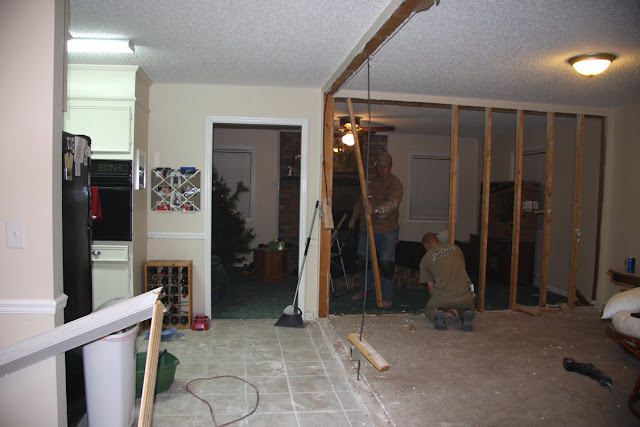
Here, you can see some of our kitchen.


One wall down.  One to go.  
Here, you can see the wood paneling from the den.


With the wood paneling gone, we're almost there!


Now with both walls down, all that's left to tear down is the old doorway leading into the den.  


And, finally, our living area is free of walls!  We had big hopes and dreams of having a COMPLETELY open living space free of any columns. However, our little nest had different plans.  Our roof is being held up by a beam that Alan and his Dad built before the walls came down in the attic above the existing beam and the support column you see in the middle of the room.  Yep, smack dab in the middle of the room, is a column we can't remove.  However, you can see where Alan installed light switches and outlets on the column, which we have found to be extremely convenient.


Also, you will notice that the far den wall came down.  Since it was wood paneling, unlike the front room, which is sheetrock, it had to come down so that we would have one whole sheetrock wall, instead of a half sheetrock, half wood paneled wall. 

Lastly, you can see that our carpet, both the green monster, and the cream carpet in the front room are gone.  After pulling up the cream carpet and posting it in the free section on Craigslist, we quickly had someone at our house to pick it up and take it off of our hands.  It was in practically new condition because not only was it replaced before we moved in, it was in our never used front room that I don't even think we did much walking on at all.  As for the Green Monster, you can read about it's fate here

I stitched together a couple of pictures for you to get the full view of our new living space.  These photos were taken at the front door and you are able to see how our (pretty large) fireplace fits in our new (bigger) living space much better than it did in our lil' ole den.  The warmth of a good fire during the winter practically ran us out of the old den.  Now, we are able to heat over half of our house in the winter without all of the heat being confined to just one room.  


Next up, it's time to install sheetrock on the column, beams, and wall. Check back to see the progress! 

Wednesday, October 6, 2010

What We're Working With

As promised, we're sharing some before pictures of the inside of our little nest. Please note, Alan took these pictures right before we started tearing walls down, and they don't make it very easy to understand the layout of our home.  He was pretty much snapping away because I begged him to document it if I wasn't present for the demolition. 

So, to help you visualize, I drew up a quick "before floor plan" for you to peruse. (Please note: A. This is NOT drawn to scale (pretty close though), and B. Obviously, I am not an artist)


We quickly decided after moving in, that the front room of unnamed origin went completely UNUSED. It had carpet (nice, brand new, non-green carpet), which to us, meant it wasn't really supposed to be used for a dining room.  Then what would we use it for? A second living room?

We didn't use it for anything but storage.  Clearly, that was an incredible waste of really great living space, considering the size of the front room compared to our lil ol' den next door.  


Front Room (Front door is to the right)


Here, you will see the view from the kitchen.  The den is through the doorway to the left.  You can tell this floor plan made everything feel pretty closed off.


This is the only living area we occupied in the house, as the front room was so closed off and felt so far away, we didn't even use it.  Also, the fireplace (not seen in this photo) was a joy in the winter months.  You can see the lovely green carpet, as well as the painted paneling, which in person, is actually pretty inconspicuous. 


This is what you saw from the doorway of the living room/den.  A lot of wall if you ask me.  I am sure with some photos hanging on it, it wouldn't have look too bad, but we had bigger and better things in mind.


Finally, this view is from the foyer or dining room or large open area not quite large enough to call an actual room, where we come in the house, since our driveway is located in the back of our house. 


And, no we don't grow trees from our greener than grass carpet back there in the living room.  It was Christmastime and that's our adorable lil' ole tree.  I will share with you just how cute it was in another post.  

So, I hope you enjoyed taking a peek at what we are working with, or should I say, what we WERE working with.  I can't wait to share what happened next!  Let's just say, it looks like a completely different house.